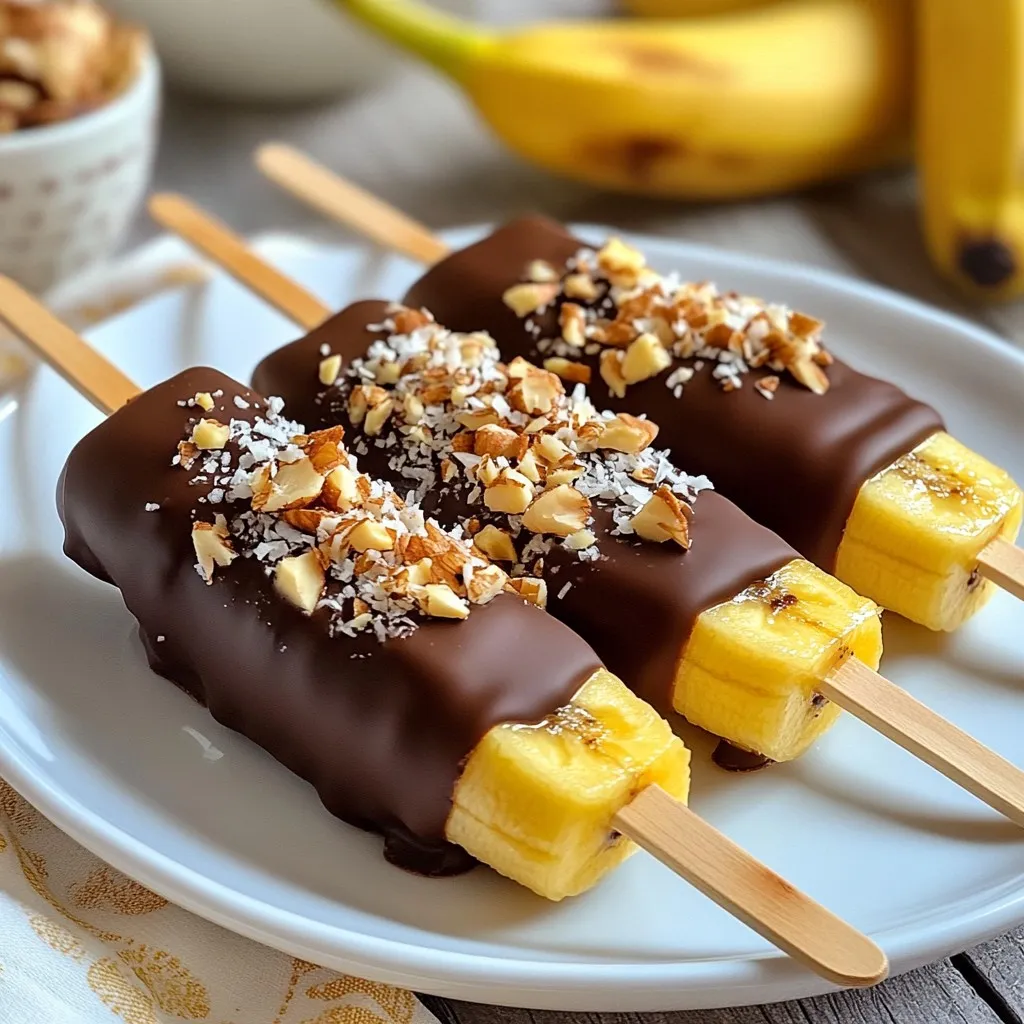
If you’re looking for a fun and simple treat, you’ve come to the right place! Chocolate covered banana pops are the perfect mix of creamy banana and rich chocolate. With just a few easy steps, you can create a delightful frozen snack for kids and adults alike. Join me as we dive into this tasty recipe! Let’s make your dessert dreams come true, one pop at a time!
Why I Love This Recipe
- Simple and Quick: This recipe is incredibly easy to make and takes just 15 minutes of prep time, making it perfect for a quick snack or dessert.
- Healthy Treat: Using ripe bananas and dark chocolate, these pops are a healthier alternative to traditional sweets, giving you a guilt-free indulgence.
- Customizable Flavors: With options to roll in crushed nuts or shredded coconut, you can personalize each pop to suit your taste preferences.
- Fun Presentation: Serving the pops upright in a glass adds a fun and attractive touch to your dessert table, impressing guests and family alike.
Ingredients
List of Ingredients
– Ripe bananas
– Dark chocolate chips
– Coconut oil
– Crushed nuts (almonds, walnuts, or pistachios)
– Unsweetened shredded coconut
– Popsicle sticks
You need ripe bananas for this treat. They should be yellow with a few brown spots. The sweetness of the banana shines through the chocolate. Next, you will need dark chocolate chips. I suggest using high-quality chocolate for the best flavor. Coconut oil helps the chocolate melt smoothly and adds a nice touch.
Crushed nuts add crunch and flavor. You can choose almonds, walnuts, or pistachios. Unsweetened shredded coconut gives a tropical twist to each bite. Lastly, popsicle sticks help you hold the banana pops while you enjoy them.
Gather these ingredients, and you’re ready for some fun in the kitchen. Each item has a part in making your chocolate-covered banana pops truly delightful!

Step-by-Step Instructions
Preparing the Bananas
First, peel the ripe bananas. Use a sharp knife to slice each banana into three equal pieces. You will get six banana pieces in total. Now, take a popsicle stick and insert it into the end of each banana piece. Make sure the stick is secure. Your banana pops are ready for the next step.
Melting the Chocolate
Now, let’s melt the chocolate. In a microwave-safe bowl, combine 1 cup of dark chocolate chips and 2 tablespoons of coconut oil. Microwave this mix in 30-second intervals. Stir well between each interval. Keep going until the chocolate is smooth. Be careful not to overheat, as chocolate can burn easily.
Dipping and Coating the Pops
Prepare your workspace by lining a baking sheet with parchment paper. This helps to prevent sticking. Next, dip each banana pop into the melted chocolate. Ensure each piece is fully coated. Allow any extra chocolate to drip back into the bowl. While the chocolate is still warm, you can roll the banana pops in your choice of toppings. Use crushed nuts or shredded coconut for added crunch and flavor.
Freezing the Pops
Once you have coated all the banana pops, place them on the lined baking sheet. Repeat the dipping and coating process for each banana piece. After all the pops are coated, transfer the baking sheet to the freezer. Let them freeze for at least 1 hour. This time allows the chocolate to harden and the pops to set properly. Once fully frozen, your delightful banana pops are ready to enjoy!
Tips & Tricks
Perfection Tips
To get a smooth chocolate coating, start with good chocolate. I love using dark chocolate chips. They melt well and taste amazing. Mix in coconut oil. This helps the chocolate stay smooth.
When melting, do it slowly. Use a microwave and stir often. If the chocolate gets too hot, it can seize up. Once you dip the bananas, let the extra chocolate drip off. This helps keep the coating even.
For toppings, choose what you like. Crushed nuts add crunch. Almonds, walnuts, or pistachios work great. Unsweetened shredded coconut gives a tropical feel. You can even mix toppings for fun flavors!
Presentation Ideas
To serve your pops, get creative! Stand them up in a tall glass. Fill the glass with rice or sand. This keeps them in place and looks cool.
For an extra treat, drizzle more melted chocolate on top. This makes the pops look fancy. It also adds more chocolate flavor, which everyone loves!
Pro Tips
- Choose High-Quality Chocolate: The flavor of your banana pops will greatly depend on the chocolate you use. Opt for high-quality dark chocolate for the best taste.
- Ensure Bananas are Firm: Use ripe but firm bananas to prevent them from becoming mushy when coated and frozen, ensuring a better texture in your pops.
- Experiment with Toppings: Get creative with your toppings! Try adding sprinkles, crushed cookies, or even a sprinkle of sea salt for a gourmet touch.
- Serve Immediately: These banana pops are best enjoyed fresh after freezing. If making ahead, store them in an airtight container to maintain their quality.
Variations
Flavoring Options
You can easily change the flavor of your banana pops. Try using white chocolate instead of dark chocolate. White chocolate adds a sweet, creamy taste. It pairs well with the banana.
You can also add flavor extracts. A drop of vanilla makes the chocolate richer. Mint extract gives a fresh and cool twist. Just remember, a little goes a long way.
Additional Coating Ideas
The fun doesn’t stop at chocolate! You can add all kinds of tasty coatings. Sprinkles bring color and crunch. Crushed cookies can add a fun twist. Try using dried fruit for a chewy texture.
Nut butters are another great option. You can spread peanut or almond butter on the chocolate. This adds a nutty depth to your pops. Each bite becomes a unique flavor experience.
Storage Info
Proper Storage Techniques
To keep your chocolate-covered banana pops fresh, you need to store them well. First, let the pops cool completely after freezing. Then, place them in a single layer in a freezer-safe container. This prevents them from sticking together. If you have many pops, use parchment paper between layers. Airtight bags also work well for storage. Just make sure to remove as much air as you can.
Shelf Life
Chocolate-covered banana pops can last in the freezer for up to three months. For the best taste, try to eat them within the first month. When you want to enjoy one, take it out of the freezer. Allow it to sit at room temperature for about five minutes. This makes the chocolate a bit softer, making it easier to bite into. Avoid using a microwave to thaw them, as it can change the texture. Enjoy your treat while it’s fresh!
FAQs
Can I use frozen bananas for this recipe?
No, using frozen bananas is not ideal. Frozen bananas can turn mushy when thawed. Fresh, ripe bananas work best for a firm and tasty pop.
How do I make this recipe vegan?
To make this recipe vegan, choose dairy-free chocolate chips. Many brands offer great options without milk. This way, you still enjoy a sweet treat.
What can I substitute for coconut oil?
You can use any neutral oil, like canola or vegetable oil. These oils will help melt the chocolate smoothly. You can also try using vegan butter if you prefer.
How can I make chocolate-covered banana pops healthier?
To make them healthier, skip the nuts and coconut. Instead, roll the pops in crushed seeds or use dark chocolate with a higher cocoa content. You can also reduce the amount of chocolate used for coating.
You learned how to make tasty chocolate-covered banana pops. We covered all steps, from prepping bananas to freezing. Plus, you found tips for the best toppings and storage. Getting creative with flavors and coatings can make each pop unique.
These pops are fun to make and eat. Enjoy experimenting and sharing them with friends. With a few simple ingredients, you can create a sweet treat that everyone will love. Make your kitchen a fun place to explore new flavor