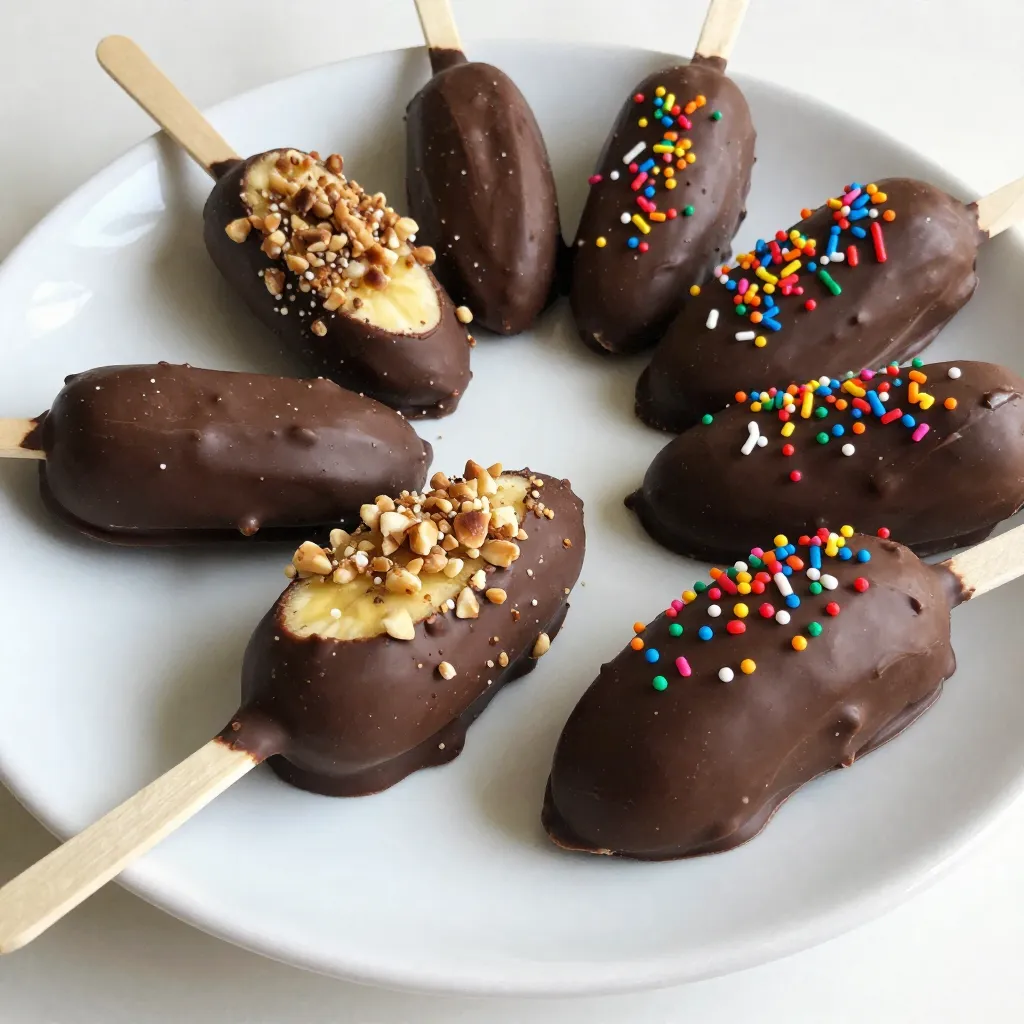
Looking for a fun and tasty treat? You’ve found it! Chocolate covered banana pops are easy to make and absolutely delicious. With just a few simple ingredients, you can transform ripe bananas into a sweet dessert that kids and adults will love. Join me as I guide you through each step, from selecting the perfect bananas to serving them up with flair. Let’s dive into these fun treats!
Why I Love This Recipe
- Simple and Fun: This recipe is incredibly easy to make, making it a great activity for kids and adults alike. The process of dipping and decorating is fun and engaging!
- Healthy Indulgence: Using bananas as the base means you’re getting a delicious treat that also provides nutritional benefits, making it a guilt-free dessert option.
- Customizable Options: You can easily switch up the toppings to suit your taste, whether you prefer nuts, sprinkles, or even coconut flakes for added flavor.
- Perfect for Any Occasion: These Chocolate Covered Banana Pops are ideal for parties, snacks, or even as a sweet treat after dinner. They impress guests and are sure to be a hit!
Ingredients
List of Ingredients
– 2 ripe bananas
– 1 cup dark chocolate chips
– 1 tablespoon coconut oil
– 1/4 cup crushed nuts (such as almonds or walnuts)
– 1/4 cup colorful rainbow sprinkles
– Wooden popsicle sticks
Equipment Needed
– Microwave-safe bowl
– Spoon for stirring
– Baking sheet or cup for holding pops
– Parchment paper (optional)
Tips for Selecting Ripe Bananas
Choose bananas that are yellow with some brown spots. These spots show the fruit is sweet and ready. Avoid green bananas; they are not ripe yet. If bananas are too brown, they may be overripe. Overripe bananas are mushy and won’t hold up well. Aim for a nice balance of ripeness for the best flavor and texture in your chocolate-covered banana pops.

Step-by-Step Instructions
Preparing the Bananas
Start by peeling the ripe bananas. Cut each banana in half to make banana pops. Take a wooden popsicle stick and insert it into the cut end of each banana. This stick will act as a handle. Make sure it goes in deep enough so it won’t fall out when you dip them in chocolate.
Melting the Chocolate
Grab a microwave-safe bowl. Add 1 cup of dark chocolate chips and 1 tablespoon of coconut oil. The oil helps the chocolate melt smoothly. Heat the bowl in the microwave for 20-30 seconds. Stir well after each time. Repeat this until the chocolate is fully melted and shiny.
Dipping and Coating the Banana Pops
Once the chocolate is ready, hold a banana pop by the stick. Dip it into the melted chocolate. Make sure it is coated all over. Let any extra chocolate drip back into the bowl. Next, roll the chocolate-covered banana in your choice of crushed nuts or colorful sprinkles. This adds a fun touch.
Freezing Instructions
Place the coated banana pops upright in a cup or lay them on a parchment-lined baking sheet. This helps keep them from sticking. Repeat the dipping and coating for all the banana halves. Next, transfer the pops to the freezer. Chill them for at least 2 hours. This allows the chocolate to harden and the bananas to firm up. After freezing, enjoy your tasty Chocolate Covered Banana Pops!
Tips & Tricks
Best Melting Techniques for Chocolate
To melt chocolate well, use a microwave-safe bowl. Add dark chocolate chips and coconut oil. Heat it carefully in the microwave. Set the timer for only 20 to 30 seconds. Stir the mixture after each interval. This method helps avoid burning the chocolate. You want it smooth and shiny. If you prefer, you can use a double boiler. Just place the bowl over simmering water. This keeps the chocolate at a safe temperature.
Achieving a Smooth Chocolate Coating
When you dip your banana pops, ensure the chocolate is melted well. You want a thick and glossy coating. Hold the banana by the stick and dip it quickly. Let the excess chocolate drip back into the bowl. This step keeps the coating even. If the coating is uneven, it may not look nice. If you want more chocolate on your pops, dip them twice. Just let the first layer set before dipping again.
Presentation Ideas for Serving
Make your banana pops look fun and festive! You can stand them in a tall glass filled with rice or sand. This adds height and keeps them upright. Sprinkle extra colorful sprinkles on the serving table. This gives a nice touch to your display. You can even use a cake stand for a more elegant look. Arrange the pops in a circle for a fun effect. Enjoy serving these treats as much as eating them!
Pro Tips
- Choose the Right Bananas: Make sure to use ripe bananas that are firm but not overly soft. This will ensure they hold up well when being dipped in chocolate.
- Chocolate Melting Technique: Stir the chocolate frequently while melting to prevent it from burning and to achieve a smooth consistency.
- Experiment with Toppings: Don’t limit yourself to just nuts and sprinkles; try adding shredded coconut, crushed cookies, or even a drizzle of white chocolate for added flavor and texture.
- Storage Tip: Store leftover banana pops in an airtight container in the freezer for up to a week to maintain their freshness and avoid freezer burn.
Variations
Flavor Variations: Different Chocolate Types
You can switch up the flavor by using different types of chocolate. Milk chocolate gives a sweet taste. Dark chocolate adds a rich, deep flavor. White chocolate offers a creamy, sweet option. Each type brings a unique twist to your banana pops. Try them all to find your favorite!
Healthier Alternatives: Using Dark Chocolate or Yogurt
For a healthier treat, use dark chocolate. It has less sugar and more antioxidants. Melt it just like you would with milk chocolate. You can also dip bananas in yogurt. Greek yogurt works well. It makes the pops creamy and adds protein. Both options keep your treat tasty and a bit healthier.
Custom Toppings: Nuts, Sprinkles, and More
Toppings add fun and crunch to your banana pops. Use crushed nuts like almonds or walnuts. They give a great texture and flavor. Rainbow sprinkles add a pop of color. You can also try shredded coconut or mini chocolate chips. Mix and match to create your perfect treat!
Storage Info
How to Store Chocolate Covered Banana Pops
To keep your chocolate covered banana pops fresh, place them in an airtight container. Use parchment paper to separate layers. This way, they won’t stick together. Store them in the freezer for the best results.
Freezer Tips for Long-lasting Treats
When freezing, make sure the banana pops are fully set. Leave them in the freezer for at least two hours. After that, they can last up to a month. Be sure to label the container with the date. This helps you keep track of their freshness.
Best Way to Thaw and Serve
To serve, take the banana pops out of the freezer. Let them sit at room temperature for about five minutes. This will make them easier to bite into. If you want them colder, serve right from the freezer. Enjoy the tasty treat!
FAQs
How long do Chocolate Covered Banana Pops last?
Chocolate Covered Banana Pops can last up to one month in the freezer. To keep them fresh, store them in an airtight container. This prevents freezer burn and keeps the chocolate tasty. When you want one, just take it out and enjoy!
Can I use other fruits for this recipe?
Yes, you can use other fruits! Strawberries, pineapple, and apple slices work great. Just make sure they are firm so they hold up when dipped in chocolate. Feel free to get creative and try your favorites!
What can I substitute for coconut oil?
If you don’t have coconut oil, use vegetable oil or melted butter. Both will help the chocolate melt smoothly. They will also give your pops a nice sheen. Choose what you have on hand, and your pops will still be delicious!
Are Chocolate Covered Banana Pops healthy?
Chocolate Covered Banana Pops can be a healthy treat. Bananas are full of vitamins and fiber. Dark chocolate has antioxidants too. Just remember to enjoy them in moderation. They make a fun snack or dessert without too much guilt!
How do I prevent the chocolate from cracking?
To avoid cracking, make sure the chocolate is smooth and warm. Dip the banana pops quickly, and let the excess chocolate drip off. If the chocolate cools too fast, it might crack when frozen. You can also use a little coconut oil to keep it smooth.
Making chocolate-covered banana pops is simple and fun. You learned how to choose ripe bananas and what tools to use. I explained how to melt chocolate and dip the bananas, plus gave tips for a smooth finish. You can add your favorite toppings or use different chocolate types. Remember to store your treats properly to keep them fresh. Chocolate-covered banana pops are a tasty treat you can enjoy any time! Now, grab your ingredients and start creating your delicious pop