
Craving a sweet treat that’s easy to grab on the go? Look no further than my irresistible Cinnamon Apple Hand Pies! With tender apples, warm spices, and a flaky crust, these hand pies bring comfort to any day. I’ll show you how to make these delicious snacks step-by-step, plus tips for variations and storage. Grab your apron, and let’s start baking these delightful bites!
Why I Love This Recipe
- Delicious Flavor Combination: The sweet and tart apples paired with warm cinnamon create a comforting and irresistible filling.
- Easy to Make: Using refrigerated pie crusts simplifies the process, making these hand pies accessible for bakers of all skill levels.
- Perfect for Any Occasion: These hand pies are great for dessert, snacks, or even as a sweet treat at gatherings and picnics.
- Customizable: You can easily adjust the spices or add ingredients like nuts or raisins to suit your taste preferences.
Ingredients
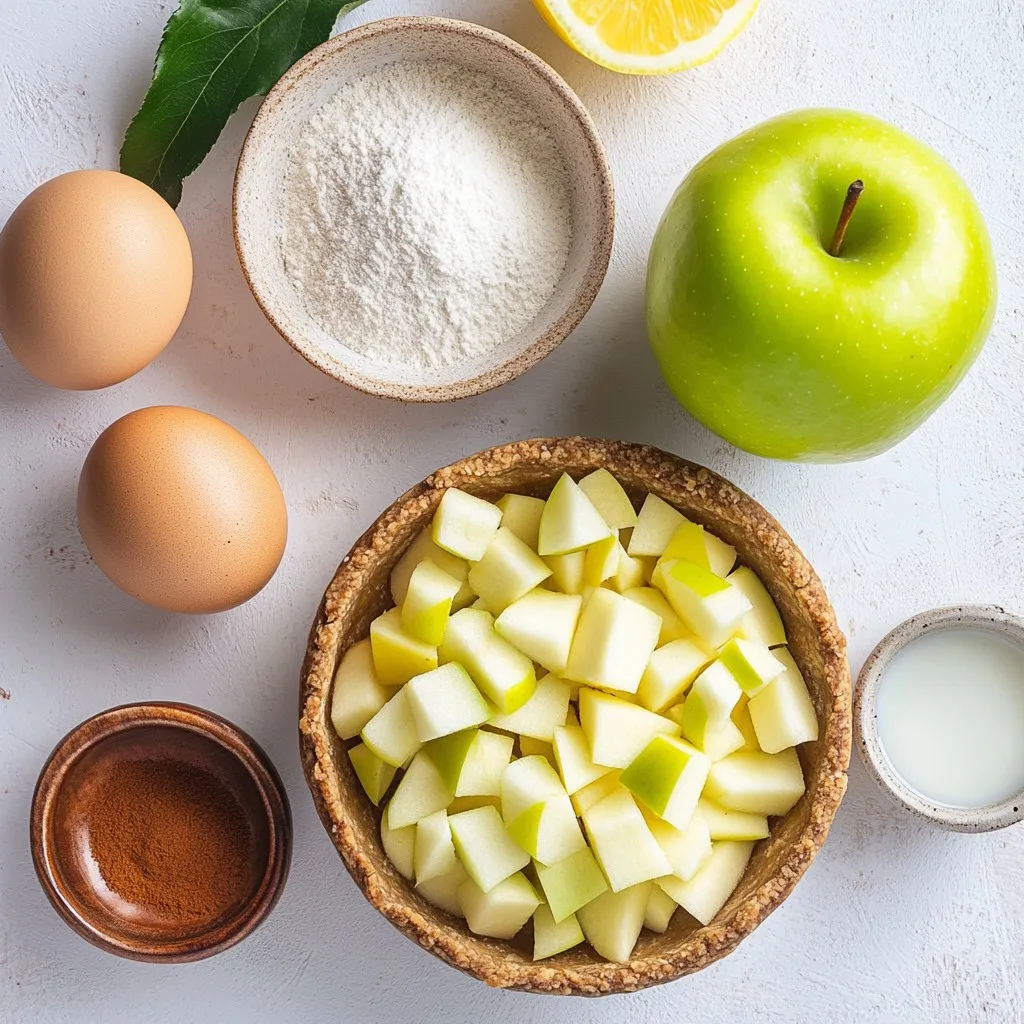
List of Ingredients
– 2 large apples (Granny Smith or Honeycrisp)
– 1 teaspoon fresh lemon juice
– 1 teaspoon ground cinnamon
– 1/4 cup granulated sugar
– 1 tablespoon all-purpose flour
– 1 package of refrigerated pie crusts (contains 2 crusts)
– 1 egg, for egg wash
– 1 tablespoon milk
– A pinch of salt
Ingredient Substitutions
You can switch out the apples for other fruits. Pears work well and add a nice flavor. You might also try berries or peaches for a twist. If you need a gluten-free crust, look for options made from almond or oat flour. Many stores offer ready-made gluten-free pie crusts, making it easy to enjoy these hand pies.
Tips for Choosing Apples
For baking, I recommend using tart apples. Granny Smith apples give a great balance of sweet and sour. Honeycrisp apples are sweet and crisp, adding a nice texture. Always choose fresh apples with no bruises. The skin should be smooth and firm.
Step-by-Step Instructions
Preparation of the Apple Filling
To make the filling, gather your apples, lemon juice, cinnamon, sugar, flour, and salt. In a medium bowl, mix the diced apples with the lemon juice, cinnamon, sugar, flour, and a pinch of salt. Toss gently until all the apples are coated. Let this mixture sit for 10-15 minutes. This waiting time helps the flavors blend and makes the filling taste better.
Prepping the Pie Crust
Start by preheating your oven to 400°F (200°C). Unroll the refrigerated pie crusts on a lightly floured surface. If you want, you can roll the dough a bit to make it thinner. Cut each crust into four equal squares. You will need eight squares total for your hand pies.
Assembling the Hand Pies
Place a generous spoonful of apple filling in the center of each square. Be careful not to overfill, as this can cause leaks. Fold each square diagonally to form a triangle. Press the edges together firmly to seal. For extra security, use a fork to crimp the edges. This step ensures a tight seal, so your filling stays inside during baking.
Baking the Hand Pies
In a small bowl, whisk the egg and milk together to make the egg wash. This mixture gives your pies a nice golden color. Arrange the filled hand pies on a baking sheet lined with parchment paper. Brush the tops with the egg wash. You can sprinkle a little sugar on top for extra crunch. Bake in your preheated oven for 20-25 minutes. The pies are done when they are golden brown and bubbling at the edges.
Tips & Tricks
Ensuring Perfectly Flaky Crust
To make a great pie crust, handle it gently. Overworking the dough can make it tough. Use a light touch when rolling and cutting. Keep your pie crust cold. Chilling the dough helps create a flaky texture. Always refrigerate the crust for at least 30 minutes before rolling it out. This step makes a big difference.
Serving Suggestions
These hand pies taste great warm. Try pairing them with a scoop of vanilla ice cream. The cold ice cream melts slightly on the warm pie. You can also drizzle caramel sauce on top. For a fancy touch, dust the pies with powdered sugar before serving. It adds beauty and sweetness.
Common Mistakes to Avoid
Don’t overfill your hand pies. Too much filling can cause them to burst in the oven. Stick to a generous spoonful in the center. This keeps your filling inside where it belongs. Also, don’t skip the egg wash. Brushing the tops with the egg and milk mixture gives a golden color. It makes your pies look and taste amazing.
Pro Tips
- Choose the Right Apples: Opt for tart apples like Granny Smith for a balanced flavor, or sweet apples like Honeycrisp for a sweeter filling.
- Prevent Soggy Bottoms: Sprinkle a little flour on the bottom of the pastry before adding the filling to absorb excess moisture.
- Make Ahead: You can prepare the filling and dough ahead of time. Assemble and bake them fresh when you’re ready to serve.
- Experiment with Spices: Feel free to add nutmeg or allspice to the apple filling for an extra flavor dimension.
Variations
Flavor Variations
You can make your cinnamon apple hand pies even more special. Try adding nuts like walnuts or pecans to the filling. This mix gives a nice crunch and depth. You can also add caramel for a sweet touch. The flavors blend well with the apples and cinnamon.
Another idea is to use extra spices. Nutmeg and clove can add warmth to your pies. Just a pinch can change the taste in a delightful way. Experimenting with flavors makes your pies unique.
Different Fruit Combinations
Mixing apples with other fruits can create new flavors. Pears pair well with apples and add a soft texture. Berries like blueberries or raspberries can bring a tartness that balances the sweetness.
You can also try seasonal fruits. In fall, use cranberries for a festive touch. In summer, peaches can add a juicy twist. Each season offers fruits that can enhance your hand pies.
Alternative Cooking Methods
Want to try cooking your hand pies differently? Using an air fryer is a great option. Set the air fryer to 350°F (175°C) and cook for about 15 minutes. This method gives you a crispy outside without using much oil.
If you prefer deep frying, heat oil to 350°F (175°C). Fry the pies for about 3-4 minutes on each side. This method adds a rich flavor and golden color. Just make sure to drain them on paper towels after frying.
Storage Info
Best Practices for Storing Hand Pies
You can store your hand pies in two ways: refrigeration or freezing. If you plan to eat them soon, keep them in the fridge. Place them in an airtight container. This keeps them fresh for up to 3 days. If you want to save them for later, freezing is the way to go. Wrap each pie in plastic wrap and then place them in a freezer bag. They can last up to 3 months in the freezer.
When it’s time to enjoy them again, reheating is key. For the best texture, bake them at 350°F (175°C) for about 10-15 minutes. This warms them perfectly and keeps the crust crispy. You can also microwave them, but this may make the crust a bit soft.
Shelf Life Information
Hand pies can last a good while if stored right. In the fridge, they stay fresh for about 3 days. In the freezer, they can last up to 3 months. To check if they are still good, look for signs of spoilage. If they smell off or have a strange color, it’s best to throw them away.
Meal Prep Tips
If you have a special event coming up, you can make these hand pies ahead of time. Prepare the filling and the dough a day before. Store the filling in the fridge and the dough in a cool place. This saves you time on the day of your event.
For future use, here’s a tip: freeze the unbaked hand pies. Once they are wrapped, you can bake them straight from the freezer. Just add a few extra minutes to the baking time. This way, you always have a tasty treat ready to go!
FAQs
Can I use frozen apples for this recipe?
Yes, you can use frozen apples. Thaw them first and drain excess liquid. This helps keep your hand pies from getting soggy. Frozen apples work well for pies, as they maintain flavor and texture. Just remember to adjust the sugar amount since frozen apples can be sweeter.
How do I know when the hand pies are done?
Look for a golden-brown color on the crust. The filling should bubble slightly at the edges. You can also gently poke a pie with a fork. If it feels firm and hot inside, they are ready. The baking time is usually about 20-25 minutes.
Can I make the dough from scratch?
Yes, making dough from scratch is easy! Simply mix 2 1/2 cups of all-purpose flour, 1 teaspoon of salt, and 1 cup of cold butter. Blend until crumbly, then add ice water until it forms a ball. Homemade dough tastes fresh and can be more flaky than store-bought.
Benefits of homemade versus store-bought:
– Taste: Homemade has a richer flavor.
– Control: You know exactly what goes in it.
– Freshness: It’s often more tender and flaky.
Are these hand pies suitable for gluten-free diets?
Yes, you can make them gluten-free! Use gluten-free pie crusts available at stores. Look for one made with rice flour or almond flour for a great texture. You can also try making your own gluten-free crust using a mix of gluten-free flour, butter, and salt. Adjust the water until the dough holds together.
You can create delicious apple hand pies using simple ingredients and easy steps. We explored ingredient choices, preparation techniques, and ways to avoid common mistakes. Remember, picking the right apple can enhance your pies’ taste. Don’t hesitate to try variations and alternative methods for cooking. With practice, you’ll make perfect hand pies every time. Enjoy these treats fresh, or store them safely for later. Happy bakin