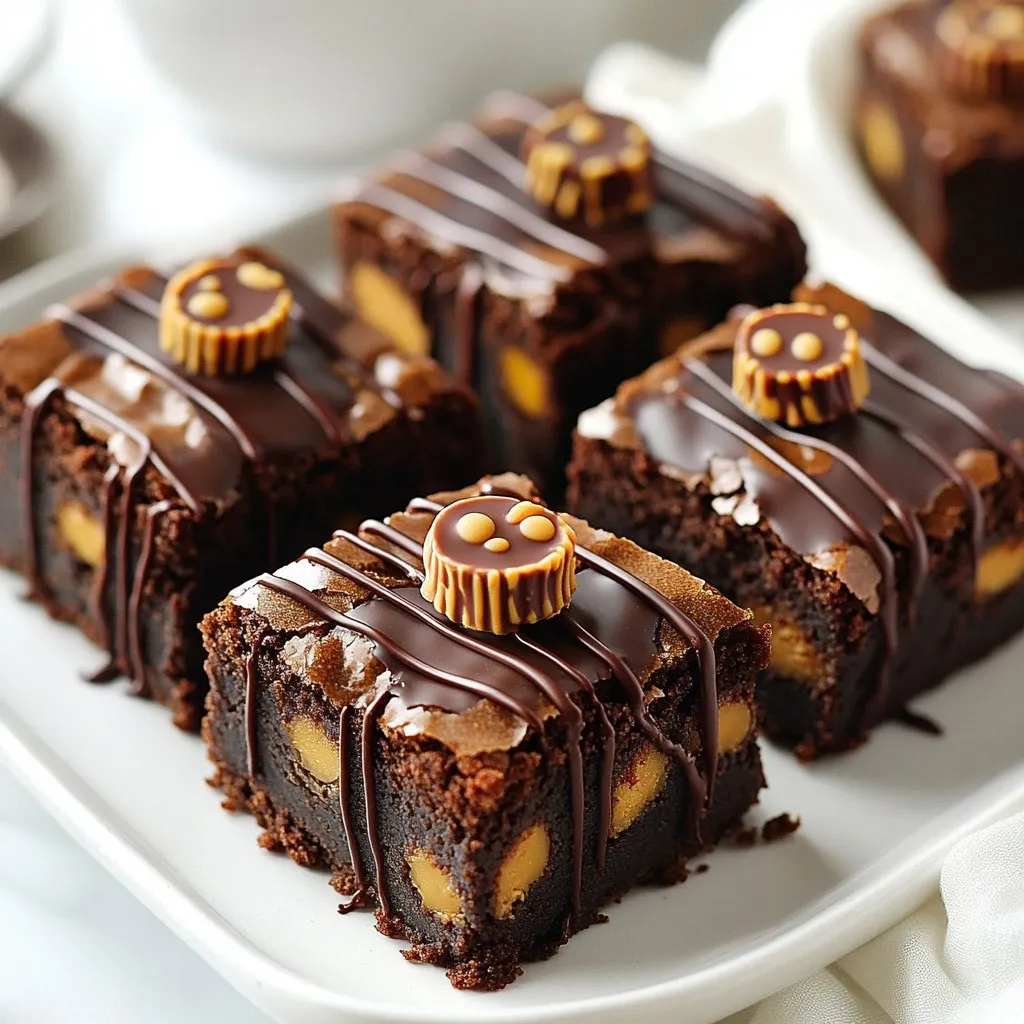
If you crave a dessert that combines rich chocolate and creamy peanut butter, you’re in the right place! These Peanut Butter Cup Brownies are a simple yet indulgent treat sure to satisfy your sweet tooth. With just a handful of ingredients, you can whip up a batch that’s perfect for any occasion. Let’s dive into the easy steps to create this rich and decadent delight!
Why I Love This Recipe
- Decadent Chocolate and Peanut Butter Fusion: This recipe perfectly combines rich chocolate brownies with creamy peanut butter, creating a deliciously indulgent treat that satisfies all cravings.
- Easy to Make:
- Perfect for Sharing: With 20 generous servings, these brownies are ideal for parties, potlucks, or just sharing with family and friends. Everyone will love them!
- Customizable Deliciousness: You can easily add your favorite mix-ins or toppings, like nuts or caramel, to make these brownies your own and elevate their flavor even more.
Ingredients
List of Required Ingredients
– 1 cup unsalted butter, melted
– 1 cup granulated sugar
– 1 cup packed brown sugar
– 4 large eggs
– 1 teaspoon vanilla extract
– 1 cup all-purpose flour
– 1/2 cup unsweetened cocoa powder
– 1/2 teaspoon salt
– 1 cup creamy peanut butter
– 1 cup mini peanut butter cups, chopped
– 1/2 cup chocolate chips
Optional Ingredients
– Sea salt for garnish
– Additional mini peanut butter cups for decoration
To make these brownies, you need simple but rich ingredients. The butter gives moisture, while the sugars add sweetness. Eggs bind everything together, creating a soft texture. Vanilla extract adds flavor, making each bite more enjoyable.
The flour and cocoa powder provide the brownie base. They help create that fudgy consistency we all love. Salt enhances the flavor, balancing the sweetness perfectly.
Now, the star of the show is creamy peanut butter. It adds a delightful nutty taste and makes the brownies super rich. Chopped mini peanut butter cups and chocolate chips bring extra bursts of flavor. They melt and blend into the batter, making each bite a treat.
For a finishing touch, you can add sea salt on top. It adds a great contrast to the sweetness. Extra mini peanut butter cups make your brownies even more fun and tasty. With these ingredients, you’re ready to create a dessert that everyone will love!

Step-by-Step Instructions
Preparation Steps
– Preheat your oven to 350°F (175°C).
– Prepare a 9×13 inch baking pan by greasing it or lining it with parchment paper.
– In a large bowl, combine the melted butter, granulated sugar, and brown sugar. Mix until smooth.
– Add the eggs one at a time, beating well after each. Stir in the vanilla extract.
Mixing Dry and Wet Ingredients
– In another bowl, sift together the flour, cocoa powder, and salt.
– Gradually add this dry mixture to the wet ingredients. Fold gently until no flour streaks remain.
Finalizing the Batter
– Gently stir in the creamy peanut butter until well mixed.
– Add the chopped mini peanut butter cups and chocolate chips, mixing them in evenly.
Baking Process
– Pour the brownie batter into the prepared pan. Use a spatula to spread it out evenly.
– Bake for 25-30 minutes. To test for doneness, insert a toothpick in the center. It should have a few moist crumbs.
– Let the brownies cool in the pan for 15 minutes. Then, slice into squares for serving.
Tips & Tricks
Perfecting Your Brownies
To get the best texture in your brownies, use room temperature eggs. Cold eggs can make your batter lumpy. Mix the wet ingredients well first. This helps create a smooth base for your brownies.
When combining the dry and wet ingredients, fold gently. Overmixing can make brownies tough. Stop mixing as soon as you see no flour. Keep your batter thick and rich for that perfect bite.
Presentation Tips
Arranging brownies can be fun! Use a nice platter to show them off. Cut the brownies into even squares. A clean cut will make them look more appealing.
To elevate your brownies, add toppings. Warm melted chocolate drizzled on top adds a nice touch. You can also sprinkle sea salt for a sweet and salty mix. Extra mini peanut butter cups on top make them look even better and taste amazing!
Pro Tips
- Use Room Temperature Ingredients: Allow your eggs and peanut butter to come to room temperature before mixing. This helps create a smoother batter and ensures even baking.
- Don’t Overmix the Batter: When combining the dry and wet ingredients, mix just until the flour is incorporated. Overmixing can lead to tough brownies instead of chewy, fudgy ones.
- Check for Doneness Carefully: Insert a toothpick into the center of the brownies; it should come out with a few moist crumbs. This ensures they stay fudgy without being undercooked.
- Let Them Cool Before Cutting: Allow the brownies to cool completely in the pan before slicing. This helps them set and makes for cleaner cuts.
Variations
Flavor Variations
You can easily change the flavor of your brownies. Swapping chocolate chips for white chocolate or dark chocolate gives a new twist. Each type of chocolate adds a unique taste. You can also add nuts like walnuts or pecans for crunch. Other candies, like caramel bits or toffee, can add fun flavor surprises.
Dietary Adaptations
If you need gluten-free brownies, try using almond flour instead of all-purpose flour. This change keeps the texture rich and moist. For a vegan option, swap the eggs with flax eggs or silken tofu. Use coconut oil or vegan butter in place of regular butter. These swaps let everyone enjoy your brownies, no matter their diet.
Storage Info
Proper Storage Techniques
To keep your peanut butter cup brownies fresh, use the right containers. I recommend an airtight container. It keeps the brownies moist and prevents them from drying out. You can also use a glass dish with a tight lid. If you stack them, place parchment paper between layers to avoid sticking.
You can store brownies at room temperature for up to five days. Just make sure they are in a cool, dry place. If it’s warm, consider refrigeration. This helps them last longer, but it may change the texture. Cold brownies can become a bit firm.
Freezing Brownies
Freezing brownies is a great way to extend their life. First, let them cool completely. Then, cut them into squares. Wrap each square in plastic wrap. This keeps them fresh and prevents freezer burn. Place the wrapped brownies in a freezer bag or container. They can last up to three months in the freezer.
When you are ready to eat them, thaw the brownies in the fridge overnight. If you want them warm, you can microwave them for a few seconds. This makes them soft and gooey again. Enjoy your treats any time!
FAQs
Common Questions about Peanut Butter Cup Brownies
Can I use crunchy peanut butter instead of creamy?
Yes, you can use crunchy peanut butter. This choice adds extra texture and flavor. The brownies will still be rich and delicious.
How do I know when the brownies are fully baked?
Check the brownies after 25 minutes. Insert a toothpick into the center. It should come out with a few moist crumbs, but no wet batter. If it comes out clean, they may be overbaked.
Can I make these brownies ahead of time?
Absolutely! You can bake them a day or two in advance. Just store them in an airtight container. This keeps them fresh and tasty.
What can I do if I have leftover brownies?
If you have extras, store them properly. Place them in an airtight container at room temperature. You can also freeze them for later. Just wrap each square in plastic wrap before freezing.
You now have a clear guide to making delicious peanut butter cup brownies. We covered the ingredients you need, step-by-step instructions, tips for perfecting your brownies, and even variations to try. These brownies are fun to make and even better to eat. Remember, baking is about enjoying the process. Experiment with flavors, and don’t be afraid to make these treats your own. Now it’s time to get baking and enjoy your sweet creation