Are you ready to treat yourself to a creamy, dreamy dessert? Dive into my Vegan Chocolate Peanut Butter Nice Cream Delight! This easy recipe uses ripe bananas and simple, wholesome ingredients like peanut butter and cocoa powder. It’s pure bliss in every scoop. No ice cream maker needed! Let’s create a guilt-free treat that satisfies your sweet tooth. Join me on this fun journey to your new favorite dessert!
Why I Love This Recipe
- Deliciously Creamy: This nice cream has a rich, creamy texture that rivals traditional ice cream, making it a satisfying treat.
- Healthy Ingredients: Made with just bananas, peanut butter, and cocoa, it’s a guilt-free dessert packed with nutrients.
- Quick and Easy: With only a few simple steps and minimal prep time, you can whip up this delightful dessert in no time.
- Customizable: Feel free to adjust sweetness or add toppings like nuts or chocolate chips to make it your own!
Ingredients
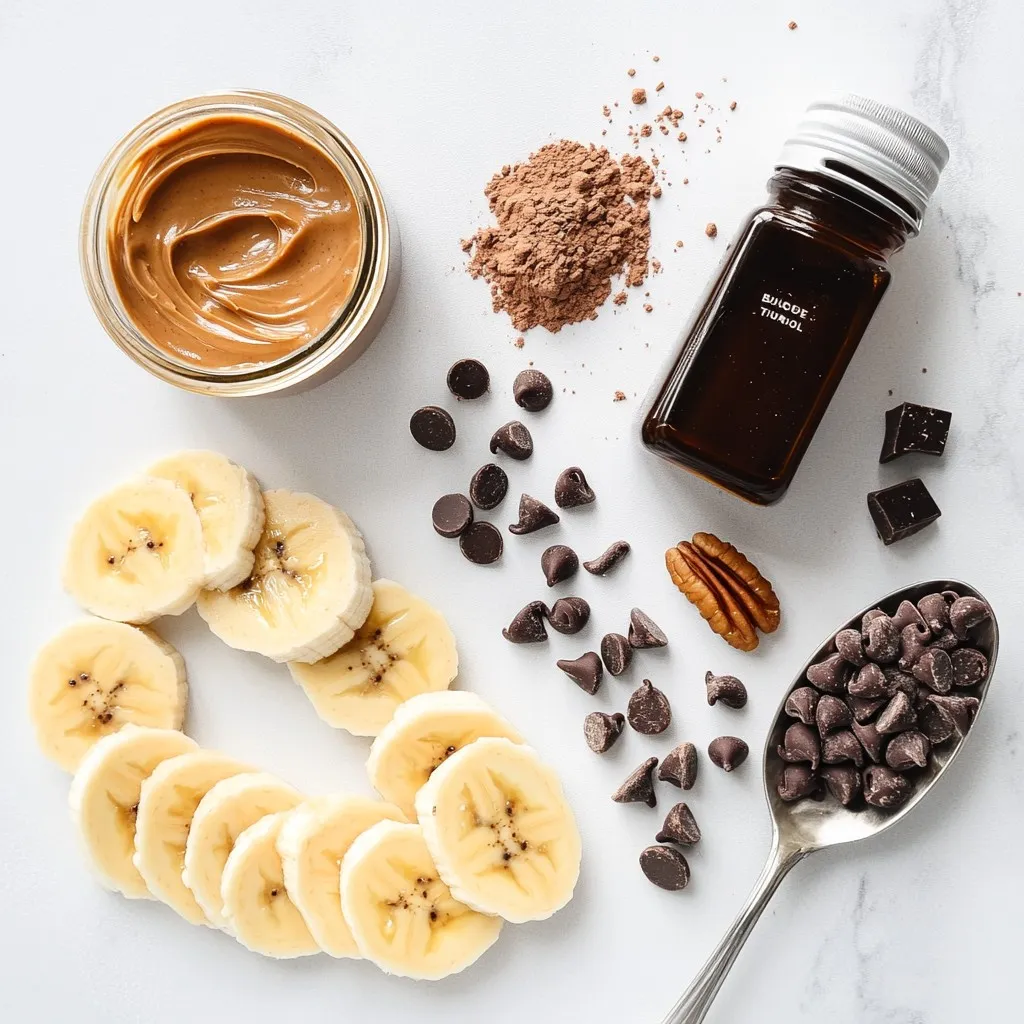
To create the Vegan Chocolate Peanut Butter Nice Cream, you need a few simple ingredients. Here’s what you will need:
– 4 ripe bananas, sliced and frozen
– 2 tablespoons natural peanut butter
– 2 tablespoons unsweetened cocoa powder
– 1 tablespoon maple syrup (optional, for additional sweetness)
– 1 teaspoon vanilla extract
– A pinch of sea salt
– Dark chocolate chips or chopped nuts for garnish (optional)
Each ingredient plays a vital role in making this nice cream both creamy and tasty. The ripe bananas are the base, giving it a smooth texture and natural sweetness. The peanut butter adds a rich, nutty flavor, while cocoa powder gives it that chocolatey essence we all love.
Maple syrup is optional but can enhance the sweetness. Vanilla extract adds depth, and a pinch of sea salt balances all the flavors. Lastly, you can top your nice cream with dark chocolate chips or chopped nuts for an extra treat.
These ingredients are easy to find. Feel free to experiment with them to suit your taste. Enjoy making your nice cream with these delightful components!
Step-by-Step Instructions
Preparing the Bananas
Start with 4 ripe bananas. Peel them, slice them into small pieces, and freeze them. Make sure the banana slices are well frozen. This step is key to getting a smooth texture.
Blending the Ingredients
Place the frozen banana slices into a high-speed blender. Add 2 tablespoons of natural peanut butter. Then, add 2 tablespoons of unsweetened cocoa powder. If you want it sweeter, add 1 tablespoon of maple syrup. Don’t forget 1 teaspoon of vanilla extract and a pinch of sea salt. Blend all these ingredients together. Stop to scrape down the sides to mix well.
Achieving the Desired Consistency
Blend until the mixture is smooth and creamy. Taste it to see if it is sweet enough. If not, add a bit more maple syrup. Blend again until it is just right.
Serving Suggestions
Once it’s creamy, you have two options. You can eat it right away for a soft-serve treat. Or you can freeze it for 1 to 2 hours for a firmer nice cream. When ready to serve, scoop it into bowls or cones. Top with dark chocolate chips or chopped nuts if you like extra crunch. Enjoy your tasty vegan treat!
Tips & Tricks
How to Make It Creamier
To achieve a creamier texture, start with very ripe bananas. They should be sweet and soft. Frozen bananas work best, as they blend smoothly. If you want even more creaminess, add a splash of plant-based milk. Almond or oat milk can give it a nice touch. Blend until smooth, and check for lumps. You can also try using a high-speed blender for better results.
Adjusting Sweetness
Taste your nice cream before serving. If you want it sweeter, add more maple syrup. Start with a little and blend again. You can also use dates for natural sweetness. Just blend them in with the other ingredients. Keep in mind that the ripeness of your bananas affects sweetness too. Riper bananas mean a sweeter nice cream.
Storing for Future Enjoyment
To store your nice cream, use an airtight container. This keeps it fresh for later. If you want to enjoy it later, freeze it for up to a week. Just remember to let it sit out for a few minutes before scooping. This helps it soften. For best results, cover the surface with plastic wrap before sealing. This prevents ice crystals from forming.
Pro Tips
- Use Overripe Bananas: The riper the bananas, the sweeter and more flavorful your nice cream will be. Look for bananas with brown spots for the best taste.
- Experiment with Flavors: Feel free to add other ingredients like almond butter, vanilla bean, or even a pinch of cinnamon for a unique twist on this classic treat.
- Blend in Batches: If your blender struggles with the frozen bananas, consider blending in smaller batches or adding a splash of non-dairy milk to help it along.
- Store Properly: To maintain the best texture, store any leftover nice cream in an airtight container and consume within a week. If it gets too hard, let it sit at room temperature for a few minutes before serving.
Variations
Different Flavor Combinations
You can mix flavors for fun twists! Swap peanut butter for almond or sunflower seed butter. Try adding 1 tablespoon of peanut butter powder for a lighter option. For a fruity twist, add berries or mango. This gives your nice cream a fresh taste. Consider adding a dash of cinnamon for warmth. You can also use flavored extracts, like hazelnut or coffee, to change things up.
Dietary Adjustments (e.g., nut-free)
If you need a nut-free option, use sunflower seed butter. It tastes great and keeps the nice cream creamy. You can also skip the nut toppings. Instead, top with seeds or coconut flakes. Make sure to check for allergens in your chosen ingredients. This way, everyone can enjoy this treat without worry.
Seasonal Ingredients
Use seasonal fruits for extra flavor. In summer, add fresh strawberries or peaches to your nice cream. In fall, try pumpkin puree and a pinch of nutmeg. Winter can bring in peppermint extract for a festive touch. Using seasonal ingredients makes your nice cream even more special. Plus, it supports local farms and tastes amazing!
Storage Info
Freezing Guidelines
To store your vegan chocolate peanut butter nice cream, freeze it in an airtight container. Use the nice cream within one month for the best taste. If you want a soft-serve texture, enjoy it right after blending. For firmer nice cream, freeze it for one to two hours before serving.
Best Practices for Re-using Leftovers
If you have leftovers, scoop them into a container and keep them in the freezer. Before reusing, let the nice cream sit at room temperature for a few minutes. This makes it easier to scoop. You can also microwave it for about 10 seconds to soften it. Just be careful not to melt it too much.
Container Recommendations
Choose a container that seals tightly to keep your nice cream fresh. Glass containers work well because they do not absorb odors. Plastic containers are lighter and easier to handle. Whatever you choose, make sure it is labeled and dated. This way, you can track how long it has been in the freezer.
FAQs
Can I use other fruits in this recipe?
Yes, you can use other fruits! Bananas provide creaminess, but try mango or strawberries. These fruits will change the flavor but still taste great. If you use a fruit with more water, adjust the amount of peanut butter or cocoa. You can also mix different fruits for fun flavors.
Is this recipe gluten-free?
Yes, this recipe is gluten-free! All the ingredients in the recipe, like bananas and cocoa, are safe. Always check labels on peanut butter and cocoa to make sure they are gluten-free. This nice cream is a delicious treat for everyone, even those who avoid gluten.
How long does nice cream last in the freezer?
Nice cream lasts about one week in the freezer. However, it’s best when fresh. After a week, it may become icy or lose its creamy texture. To keep it fresh, store it in an airtight container. You can also scoop and serve it right away for the best taste.
Can I make this nice cream without a blender?
Yes, you can make nice cream without a blender! Use a food processor instead. If you do not have either, mash the bananas by hand. Mix in the peanut butter and cocoa with a fork. It may take longer, and the texture will be different. However, you can still enjoy a tasty treat!
This blog post covered how to make delicious nice cream using simple ingredients. We explored ripe bananas, peanut butter, cocoa powder, and more. You learned step-by-step instructions and useful tips to enhance your treat. We also discussed different flavor options and storage info.
Now, you have the tools to create your perfect nice cream. Enjoy experimenting with flavors and sharing your tasty creation